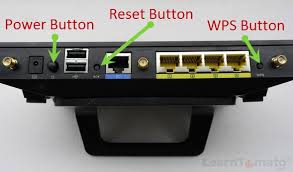
1. Make sure you are using the correct IP address for the router.
2. You can also find the router's IP by simply typing "ipconfig" in command prompt, and looking at the "Default Gateway" line.
Win. +R
Type CMD under Run
In DOS Screen Type ipconfig/all & hit enter
3. Reboot your Router & Computer.
4. Remove & reconnect ethernet Lan Cables to the lan port of router.
5. Try a Hard reset of your Router.
6. Log on your computer as a administrator with full admin rights.
7. Turn off Firewall from both public & private networks.
8. Turn off Wifi as we are going to connect Lan cable ( Rj 45).
9. Reset your Browser & clear complete history, cahce & cookies.
10. Disable the proxy server, if enabled.
(1) Click [Start] >> [Internet Explorer] to launch the web browser.
(2) Click [Tools] >> [Internet options] >> [Connections tab] >> [LAN settings].
(3) From the Local Area Network (LAN) Settings screen, untick [Use a proxy server for your LAN].
(4) Click [OK] when done.
11. Check whether the TCP/IP settings are correct or not ?
Note: The IP address of your computer must be in the same subnet with the router in order to connect to it.
For example: The IP address of your router is 192.168.1.1, so the IP address of your computer should be in the range of 192.168.1.2 ~ 192.168.1.254 and with a subnet mask 255.255.255.0, the Default Gateway should be 192.168.1.1.
Step 1 :
Check the IP configuration
1. Click Start->Run, type cmd and press Enter to open prompt window.
2. Type ipconfig/all and press Enter at the prompt window. It will show the IP address, subnet mask, default gateway, DNS Servers and so on
Note: If the IP address is 169.254.X.X or 0.0.0.0, it means that the IP address is incorrect. You need to reconfigure the TCP/IP Properties for your computer.
Step 2 :
Ping the IP address of the router
Click Start -> Run, type cmd and press Enter, and then type ping 192.168.1.1 at the prompt window and press Enter.
Note: If you had changed the default IP Address of the Router, please type the new IP address instead of 192.168.1.1.
1. If the result shown as below, it means the IP address is correct and can connect to the router.
12. Set the TCP/IP settings to automatically obtain an IP address.
13. Ping to 192.168.1.1 & check statics with all Lan 1,2,3 & Lan 4 Ports respectively
if loss = 100 % then check with diff. cable or computer or contact to Service center.
Ping Results Analysis
1. Reply From…(Ping Success)
Ideally you will see four “Reply from” messages followed by “0% loss” which indicates that the connection between your PC and router (meaning its settings, cables, hardware) is working well.
2. Request timed out. ( Ping Failed )
Four of these “Request timed out.” messages and “100% loss” mean that the communication between your router and PC has failed. You can try to unplug your router for 10-20 seconds and plug it in again. Try to ping 192.168.1.1 again in a few minutes. Hopefully, you will see “Reply from” messages. You can also connect another router instead of the old one and ping its IP address. Check the results. If the ping is successful it means that the connections work well and that the problem is in the router.
If you see both “Reply from…” and “Request timed out” the reason is most probably in defective network hardware or bad cabling.
3. Destination host unreachable
This message will appear when there is a problem in the communication between your PC and the router. In this case restart the router (unplug it and plug it in again) and ping 192.168.1.1 again.
4. Unknown host
This message generally tells us that the IP the user has typed doesn’t exist. It is usually caused by a typing error (like typing 192.168.l.l instead of 192.168.1.1) or hardware connectivity problems.
Conclusion
The Ping command is very useful and should be the first thing you do when you decide to fix some internet/home network connectivity problems. When using the Ping command we can say that if the results are good they really are, but if the ping fails that can be for a number of different reasons.
How do I renew the IP address for my computer ?
Step 1 : Click Start->Run, type cmd and press Enter.
Step 2 : Type ipconfig /release at the prompt window, press Enter, it will release the current IP configuration.
Step 3 : Type ipconfig /renew at the prompt window, press Enter, wait for a while, the DHCP server will assign a new IP address for your computer.
For Windows Vista & Windows 7
Step 1 : Click Start on the task bar, type cmd into the search box and press Enter.
Step 2 : Type ipconfig /renew at the prompt window, wait for a while, the DHCP server will assign a new IP address for your computer.


