Thank You for visiting at http://technetworkx.blogspot.in/ !! This Site is being updated continuously So, keep visiting here, shortly you'll get best solution for your technical concerns !!

Thursday, 31 December 2015

How to Increase the Range of your Wireless Network, Best Ways to Boost Your Wireless Signal, How to improve wireless speed by setting Channel Bandwidth? Wi-Fi range is not sufficient to reach my room


1. Place Your Router in Open Space where there is no obstacles.

2. Try to Place it in Center of room  instead of locating to corner walls because most routers have omni-directional antennas so they emit wireless signals in all directions just like a bulb of light.

3. Keep it away from other cordless devices. Make sure that the router is not placed near something metallic as that will weaken the wireless signals. 

4. Replace with high dbi antennas.

5. Can use second router as a Repeater.

6. If you are using old laptop or desktop so you can upgrade the Network card (NIC) or wireless network adapter & update the wireless driver because the reception is also matters.

7. Check Your Wireless Settings Set Different frequencies with channel bandwidth, ie., you can put 20 Mghz with 2.4 Ghz & 40 with 5 Ghz.

8. Set Channel auto or check manually diff. channels in your Router.

9. Check the Wireless properties of the NIC used in your wifi device.


How to improve wireless speed by setting Channel Bandwidth?


Wi-Fi range is not sufficient to reach my room. 
(Intermittent disconnection over wifi)

Solution : The signals of your Wi-Fi router is subjected to environmental factors within your home that includes but not limited to concrete wall and flooring, steel plate, thick structural wall, TV, Case and many more.
To improve your Wi-Fi signals, please shift your router away from these factors or purchase an wifi-adapter, external antennas access point or repeater to improve your Wi-Fi signal.


Wi-Fi disconnects on a particular mobile device but working fine on other wifi devices
Solution :
Step 1:  Check whether Wi-Fi range is sufficient to reach your room or not ?
Step 2: Please check Encryption key.
Step 3: Do not use battery saver app on mobile device.
Step 4: Disable Nighttime Saver mode or battery saver mode on device. Try using Performance Mode. Go to Settings > Battery & Data Manager > Battery Mode
Step 5: Turn on Wireless Zero Configuration (WZC) on device. Go to Start Menu > Control Panel > Administrative Tools and double-click Services.


How to check the signal category(2.4GHz or 5GHz) of the Wireless card?

BGN is for 2.4GHz &
AGN is for 2.4GHz and 5GHz.


How can I check the information of the login client?


How to control transmission speed of client device via Bandwidth Limiter?

How to check the best value of MTU(Maximum Transmission Unit) for the internet?

How to configure RADIUS setting in Asus Router ?


How to Configure wireless Security ?


1. Open router page 192.168.1.1 > admin --admin

2. Go to Wireless Option > General

3. Frequency - 2.4/5 ghz

4. SSID - put any unique name

5. Mode  - Auto

6. Authentication type -  wpa 2-personal

7. Encryption - AES

8. Wireless Key - password for wifi

9. click on Apply Settings

How to change my wireless password?

Wednesday, 23 December 2015

How to Identifying Your WAN Connection Type ?


To configure your Broadband Router you must select your WAN Connection type in the router's Web User Interface. Based on your WAN type, you may need to provide additional information about your Internet connection. If you already know your WAN type, select it from the following list to see which additional information you must provide:

1. Automatic IP or Dynamic IP
2. Static IP
3. PPPoE
4. PPTP
5. L2TP

The first indication of your WAN type is the type of modem that you use for Internet access:


DSL Modem : PPPoE

Most DSL Internet service providers use PPPoE to deliver service to their customers. If you use a DSL modem, your WAN type is probably PPP over Ethernet.

Other Broadband Modem : Dynamic IP/Automatic Ip or Static IP

If you use a non-DSL modem, such as cable, wireless, or satellite, to connect to your Internet service provider, your WAN type is probably Dynamic IP Address. You may be able to determine your WAN type by inspecting the IP properties on your computer. The following instructions will help you obtain your connection type from your Windows computer.


Display your TCP/IP settings as follows:

Windows XP users:

Click Windows Start > Control Panel.
Click the Network and Internet Connections icon.
Click the Network Connections icon.
Right-click the icon that represents your network connection and select Properties.


2. Select the TCP/IP item for your modem network adapter, and click Properties.

> If the Obtain an IP address automatically option is selected, your IP address is allocated dynamically, and your WAN type probably is Dynamic IP Address.

> If the Use the following IP address option is selected, you have a static IP address, and your WAN type probably is Static IP Address. Examine and note each property's value because you will need to enter those values in the Setup Wizard. With a static IP address WAN type, you must change your computer to use a dynamic IP address, which it obtains from the router.

1. Select Obtain an IP address automatically and click OK.
2. If necessary, click OK again to close the Network Properties window.
3. If you are prompted to restart your computer, click Yes.


Macintosh Users

1. Macintosh OS X Users: Click Apple> System Preferences > Network and change the Show option to Built-in Ethernet.

Macintosh OS 9.x Users: Click Apple > Control Panels > TCP/IP and change the Connect via option to Ethernet.
If the Configure: option is set to Using DHCP, your IP address is allocated dynamically, and your WAN type probably is Dynamic IP Address.

2. If the Configure: option is not set to Using DHCP, you have a static IP address, and your WAN type probably is Static IP Address. Examine and note each TCP/IP property's value because you will need to enter those values in the Setup Wizard. With a static IP address WAN type, you must change your computer to use a dynamic IP address, which it obtains from the router.

i. Set the Configure: option to Using DHCP.
ii. Click Save, and close the TCP/IP or Network window.

Macintosh OS X Users: Click Apple> System Preferences > Network and change the Show option to Built-in Ethernet.

Macintosh OS 9.x Users: Click Apple > Control Panels > TCP/IP and change the Connect via option to Ethernet.
If the Configure: option is set to Using DHCP, your IP address is allocated dynamically, and your WAN type probably is Dynamic IP Address.
If the Configure: option is not set to Using DHCP, you have a static IP address, and your WAN type probably is Static IP Address. Examine and note each TCP/IP property's value because you will need to enter those values in the Setup Wizard. With a static IP address WAN type, you must change your computer to use a dynamic IP address, which it obtains from the router.

Set the Configure: option to Using DHCP.
Click Save, and close the TCP/IP or Network window.

Tuesday, 22 December 2015

Can’t access 192.168.1.1 Router's Configuration(Admin Login) page ?


1. Make sure you are using the correct IP address for the router.

2. You can also find the router's IP by simply typing  "ipconfig" in command prompt, and looking at the "Default Gateway" line.


 Win. +R

Type CMD under Run

In DOS Screen Type ipconfig/all & hit enter


3. Reboot your Router & Computer.

4. Remove & reconnect ethernet Lan Cables to the lan port of router.

5. Try a Hard reset of your Router.

6. Log on your computer as a administrator with full admin rights.

7. Turn off Firewall from both public & private networks.

8. Turn off Wifi as we are going to connect Lan cable ( Rj 45).

9. Reset your Browser & clear complete history, cahce & cookies.

10. Disable the proxy server, if enabled.

         (1) Click [Start] >> [Internet Explorer] to launch the web browser.

         (2) Click [Tools] >> [Internet options] >> [Connections tab] >> [LAN settings].


(3) From the Local Area Network (LAN) Settings screen, untick [Use a proxy server for your LAN].

(4) Click [OK] when done.


11. Check whether the TCP/IP settings are correct or not ?


Note: The IP address of your computer must be in the same subnet with the router in order to connect to it.
For example: The IP address of your router is 192.168.1.1, so the IP address of your computer should be in the range of 192.168.1.2 ~ 192.168.1.254 and with a subnet mask 255.255.255.0, the Default Gateway should be 192.168.1.1.

Step 1 :

Check the IP configuration

1.    Click Start->Run, type cmd and press Enter to open prompt window.

2. Type ipconfig/all and press Enter at the prompt window. It will show the IP address, subnet mask, default gateway, DNS Servers and so on


Note: If the IP address is 169.254.X.X or 0.0.0.0, it means that the IP address is incorrect. You need to reconfigure the TCP/IP Properties for your computer.

Step 2 :

Ping the IP address of the router

Click Start -> Run, type cmd and press Enter, and then type ping 192.168.1.1 at the prompt window and press Enter.

Note: If you had changed the default IP Address of the Router, please type the new IP address instead of 192.168.1.1.

1. If the result shown as below, it means the IP address is correct and can connect to the router.


2. If the result shown as below, it means that your computer can not connect to the router, you need reconfigure the TCP/IP configuration of your computer or renew for a new IP address when you had been configure the computer to obtain an IP address automatically.


12. Set the TCP/IP settings to automatically obtain an IP address.


13. Ping to 192.168.1.1 & check statics with all Lan 1,2,3 & Lan 4 Ports respectively
if loss = 100 % then check with diff. cable or computer or contact to Service center.


Ping Results Analysis


1. Reply From…(Ping Success)

Ideally you will see four “Reply from” messages followed by “0% loss” which indicates that the connection between your PC and router (meaning its settings, cables, hardware) is working well.


2.  Request timed out. ( Ping Failed )

Four of these “Request timed out.” messages and “100% loss” mean that the communication between your router and PC has failed. You can try to unplug your router for 10-20 seconds and plug it in again. Try to ping 192.168.1.1 again in a few minutes. Hopefully, you will see “Reply from” messages. You can also connect another router instead of the old one and ping its IP address. Check the results. If the ping is successful it means that the connections work well and that the problem is in the router.


If you see both “Reply from…” and “Request timed out” the reason is most probably in defective network hardware or bad cabling.

3. Destination host unreachable

This message will appear when there is a problem in the communication between your PC and the router. In this case restart the router (unplug it and plug it in again) and ping 192.168.1.1 again.

4. Unknown host

This message generally tells us that the IP the user has typed doesn’t exist. It is usually caused by a typing error (like typing 192.168.l.l instead of 192.168.1.1) or hardware connectivity problems.

Conclusion

The Ping command is very useful and should be the first thing you do when you decide to fix some internet/home network connectivity problems.  When using the Ping command we can say that if the results are good they really are, but if the ping fails that can be for a number of different reasons.


How do I renew the IP address for my computer ?

Step 1 :  Click Start->Run, type cmd and press Enter.

Step 2 :  Type ipconfig /release at the prompt window, press Enter, it will release the current IP configuration.

Step 3 : Type ipconfig /renew at the prompt window, press Enter, wait for a while, the DHCP server will assign a new IP address for your computer.


For Windows Vista & Windows 7
Step 1 : Click Start on the task bar, type cmd into the search box and press Enter.


Step 2 : Type ipconfig /renew at the prompt window, wait for a while, the DHCP server will assign a new IP address for your computer.


Friday, 18 December 2015

How to upgrade Firmware Version ?


(1) First Go to Asus support site  Click Here........ 

(2) Search your Product's Model Name > Driver & Tools > Choose OS >

(3) Click on Firmware > Download the latest one > extract the file & put on your desktop

(4) Connect your Router to Computer using LAN cable & disconnect ISP Cable from wan port of Router

(5) Open router page 192.168.1.1

(6) Go to - Advanced Settings - Click on administration tab

(7) Click on Firmware upgrade tab > Choose New file > Upload


Tuesday, 15 December 2015

How to Use ASUS Download Master Client ? & How to Enable your AiCloud by mobile app ?


How do I use the ASUSWRT Download Master torrent association tool ?  Click

How to use ASUS download master client  ?


Download Master:

Before you using this, please make sure you have install ASUS download master on your router:
1. Go to http://router.asus.com -> USB application -> Download master
2. Install download master on the plugged USB disk
3. Finish the installation

And when you finish the installation above, the you can download the ASUS download master client app from Google Play (iOS is not support currently)

Install & setup download master client
1. Open ASUS Download master client in AiCloud(Or you can just launch it by launch icon).
2. Click to setting icon on the top-right corner.
3. Here are parameters you have to double check:
- Web server address: This is the same ip address as your router's gateway ip, default is 192.168.1.1
- Web server port: ASUS download master use 8081 port by default, if you have modified this, please change it.
- Login: Router login name, default is "admin"
- Password: Router login password, default is "admin"
Add a task to download master
You can use popular torrent search app or download the torrent files directly to your phone SD card, and here are steps:
1. Find a torrent file or magnet link.
2. Select download master client.
3. Confirm to add this task.
4. Task is going.
Advanced settings > USB Apps Miscellaneous settings
Enable download Master > YES
-----------------------------------------------------------------------------------------------------------------------------

How to Enable your AiCloud by mobile app ?


How to Enable AiCloud via firmware & Access via web interface ?


How To Set up a Router as a Repeater ( Wireless range extender ) & AP (Access Point)


1. Open Asus router web page 192.168.1.1

2. Go to - Advanced Settings - Click on Operation Mode tab in some routers you can fine it under administration tab as seen in images below

3. Select Repeater Mode and click save

4. Open Asus router web page and click Network map option

5. Click on Globe

6. Click AP Survey -Go

7. Now select your existing network & click to connect


ASUS Device Discovery version 1.4.7.1
You can use the device discovery tool to find the IP address of wireless router.

http://dlcdnet.asus.com/pub/ASUS/wireless/RT-AC3200/Discovery_1471.zip

AP (Access Point)


Step -1  Log in 192.168.1.1

Step -2  Go to Advanced Settings > Administration > Operation Mode > Access Point > Save Apply


How to Setup Asus Router ? A Step By Step Guide to Install or Configure For Internet Settings


Hello Friends,

Today I'll teach you how to setup Asus Router for Internet Connection before telling the procedure i would like to say that there a bit difference in settings of Modem + Router (DSL) & only Routers, so lets gets started, First of all Make it clear which router you have DSL or RT ?

Things needs to be done before configuration :
1. Log on your computer as a administrator with full admin rights
2. Turn off Firewall from both public & private networks
3. Turn off Wifi as we are going to connect Lan cable ( Rj 45)
4. Reset your Browser & clear complete history, cahce & cookies
5. Check whether you have your ISP details or not ? & your internet is up or not ?


If you were trying to set it up before so, please try a Hard Reset of your Router

How to Hard reset you Router ?

1. Turn On your Router & connect it to the computer using lan cable to one of the Lan Port.

2. Unplug the ISP cable from wan port of router if connected

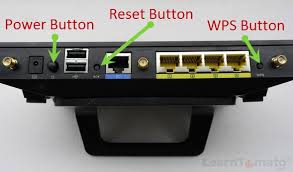
3. Look at the rear side of your router here you can see either a button or hole for reset

4. Press the reset button if there is hole use any pointing device i.e. pin or pen & press it for 20 Sec.

5. now wait & watch the Leds of your router will flicker, it flash twice in a second it indicates your

    router is reseting wait for some time


Router Setup for : DSL (Modem + Routers) 

 Internet Settings Configuration :


1. After plugging internet cable
2. Open your browser & type 192.168.1.1 in the addresse bar
3.  Put default user name : admin & password : admin
4.  At the left-side, click on ‘QUICK INTERNET SETUP’

STEP-1 WEB ACCOUNT SETUP. Here we can change the default password of the admin account of router if required. Else, select the username ‘admin’ & enter ‘admin’ in choose password & confirm password fields. 

STEP-2 ‘NTP CONFIGURATION’. NTP stands for Network Time Protocol which is used to synchronize the time clock on the internet with a router. Select the time zone as +0530/Chennai, Mumbai, Kolkata, New Delhi and then click on next. 

STEP-3 ‘WAN CONNECTION SETUP’ page. First select the country as INDIA, and then select the ISP. Typically the connection type will be either PPPoE (eg. BSNL_PPPoE, Airtel_PPPoE) or Static IP (incase the ISP provides a fixed IP to the customer). After selecting the connection type, leave all the settings to their defaults and ask whether the customer knows about the VPI & VCI values provided by ISP. However, when the ISP will be selected, these values will be filled-in automatically. In case the ISP is not listed, select ‘others’ & enter the respective VPI/VCI values. Next to this, provide the USERNAME & PASSWORD given by the ISP on this page. Now click on next. 

STEP-4 WLAN INTERFACE SETUP page. Provide the SSID name, authentication type, password, and then click on next. 

STEP-5 SUMMARY page. Check the settings once again on this page and then click on Finish. 

If all the settings are correct, the ADSL light will be stable and the Internet light will come up. (Usually within a minute or two & green/blue color LED will come in stable state.) If ADSL is blinking constantly, then there is a fault from ISP’s end/ some problem with the router. If ADSL is stable & the internet light is down, then there is some fault in either the credentials/WAN settings or with the router itself. In such cases, please check with ISP.


-------------------------------------------------------------------------------------------------------------------------------

Router Setup for -  "RT Routers" 

 Internet Settings Configuration :  { By Qis Wizard }

Note :- Mostly ISP provides Automatic IP or Dynamic Connection type If Your Connection Type is in PPPoE then Configure as a Wireless Switch Click Here

1. After plugging internet cable
2. Open your browser & type 192.168.1.1 in the addresse bar
3.  Put default user name : admin & password : admin
4.  Click on Go

 5. Put new credentials


6. click next & your Router will automatically detect the connection type however you must get the details from isp i.e., which is your connection type ?


7. Mine is Automatic Local cable net so i've choosen automatic


 8. One more important thing you must know about your connection whether your connection is Mac binded or not ? my connection is not mac id binded so left the field blank & click on Next


 9. Select connect to Dns server automatically -- Yes


10. Here Put your Wireless details & Apply


-----------------------------------------------------------------------------------------------------------------------------

Router Setup for RT Routers / Internet Settings Configuration :  { By Manual Settings }


  1. Open a web browser and browse to the following page :192.168.1.1
  2. If you are prompted for a User name and Password enter the User nameadmin and Password admin

    Asus Setup - Step 1
  3. Once you are logged in select WAN

    Asus Setup - Step 2
  4. The WAN – Internet Connection page should appear. 

    Asus Setup - Step 3
  5. In the Basic Config section enter the following details: 
    WAN Connection TypePPPoE 
    Enable WANYes 
    Enable NATYes 
    Enable UPnPYes 

    Asus Setup - Step 4
  6. In the WAN IP Setting section set Get the WAN IP automatically to Yes

    Asus Setup - Step 5
  7. In the WAN DNS Setting section set Connect to DNS Server automatically to Yes.

    Asus Setup - Step 6
  8. In the Account Setting section enter the following details: 
    User Name: You should enter the connection username in your Broadband Connection details email – the username will be in the format of zen12345@zen ("zen" followed by numbers and "@zen"). 
    Password: Enter the Password provided in your Broadband Connection details email - the password will be a mixture of letters and numbers, and is case-sensitive, so should be entered exactly as it appears in your Technical Details.
    Idle Disconnect Time in seconds0 (zero)

    Click Apply once you’ve entered these details.

    Asus Setup - Step 7
The setup should now be completed and you can start using the Internet.

You May Also Like

Related Posts Plugin for WordPress, Blogger...